Bots and Support Channels
How support channels work, why to connect your own Telegram bots, and how to split support by product or brand.
In HelpDesk, one external Telegram bot corresponds to one support channel. Customers write to the bot they already know, while your team works inside iTasks: they see a shared inbox, assign ownership, change the conversation status, and link the discussion to tasks when needed.
Plans and limits: the free plan includes 1 HelpDesk channel. PRO expands this to 50 channels in one workspace. If the first workspace exceeds the Free limit after PRO expires, new channels cannot be created, but the owner can disable or delete extra channels to return the workspace to Free.
1. What a support channel is and why it matters
A channel helps you separate external support flows by product, brand, country, or service type. Each channel has its own:
- bot and incoming client messages;
- project that the conversations and linked tasks belong to;
- channel members who receive notifications and handle the conversations;
- templates for the greeting and the new-conversation acknowledgement;
- prefix for conversation numbers such as HD or SUP.
In practice, this means you can run separate bots for website support, mobile app support, and partner requests without mixing all conversations into one queue.
2. Who can add channels and where to find the screen
Channel setup lives in Administration → HelpDesk. In practice, this screen is usually managed by workspace OWNER and ADMIN users. Regular members can still be added to channels and work with conversations, but they typically do not change the channel configuration itself.
- Open the side menu.
- Go to Administration.
- Select HelpDesk.
- Check the current plan limit in the summary block.
- Tap Add channel.
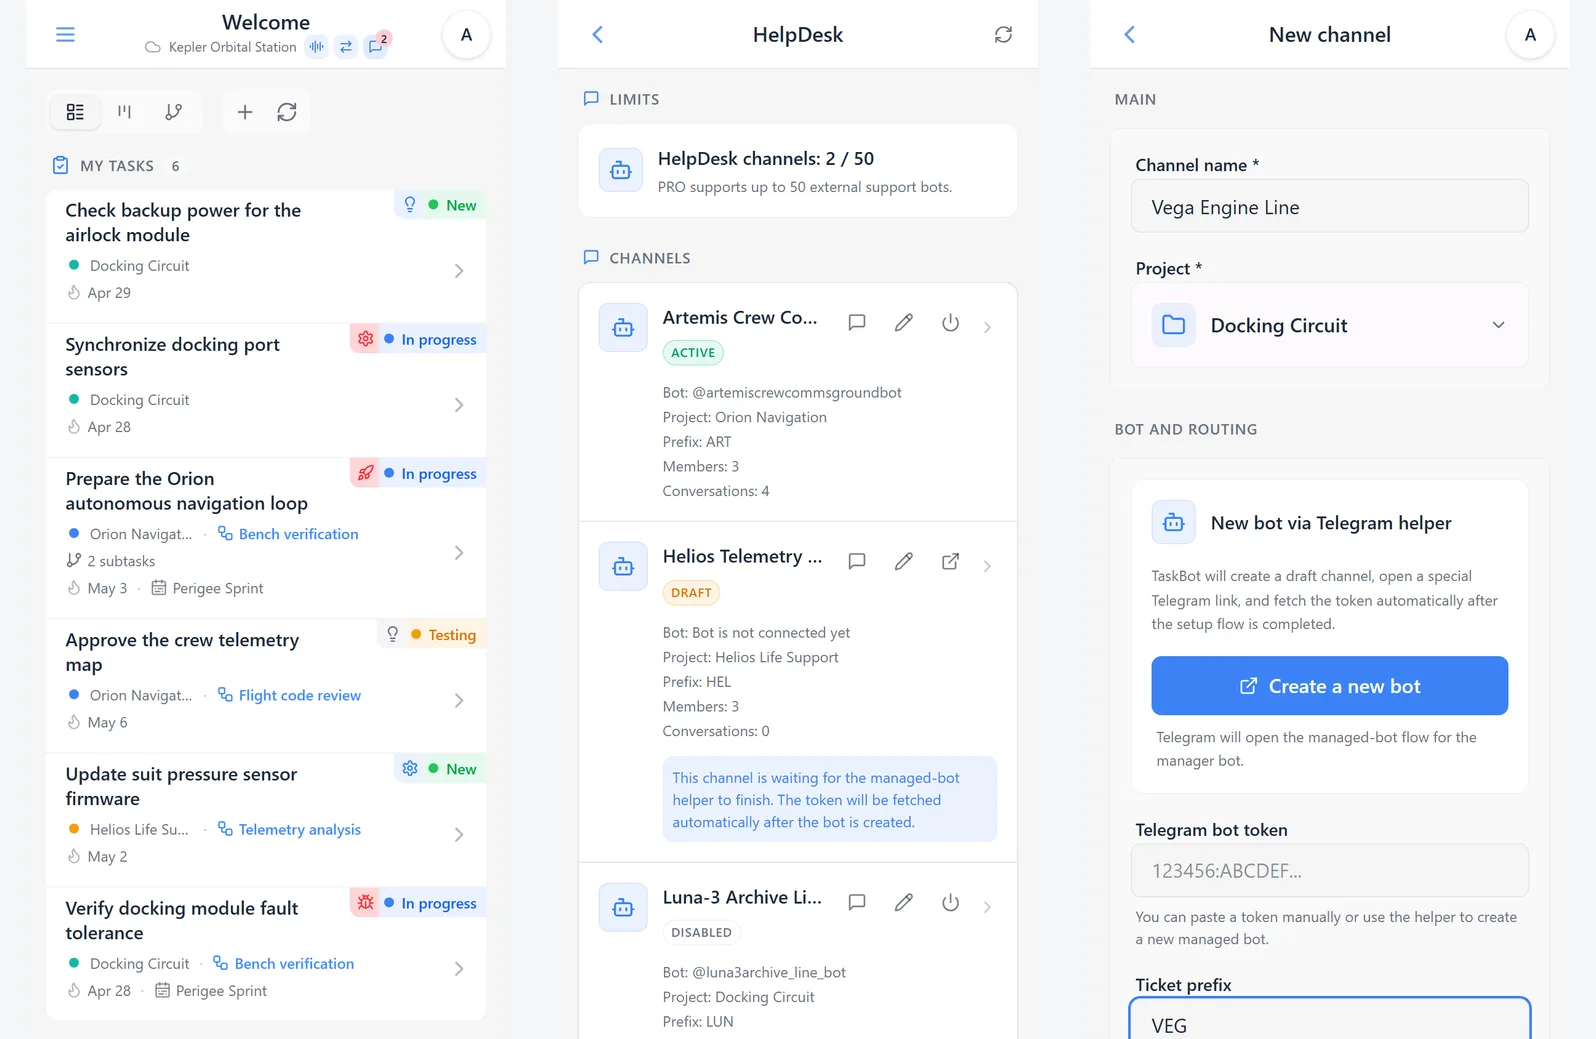
3. Which fields are configured before connecting the bot
Before choosing the bot connection method, you first fill in the channel card itself. This lets you define routing and team ownership in advance and connect the Telegram bot after that.
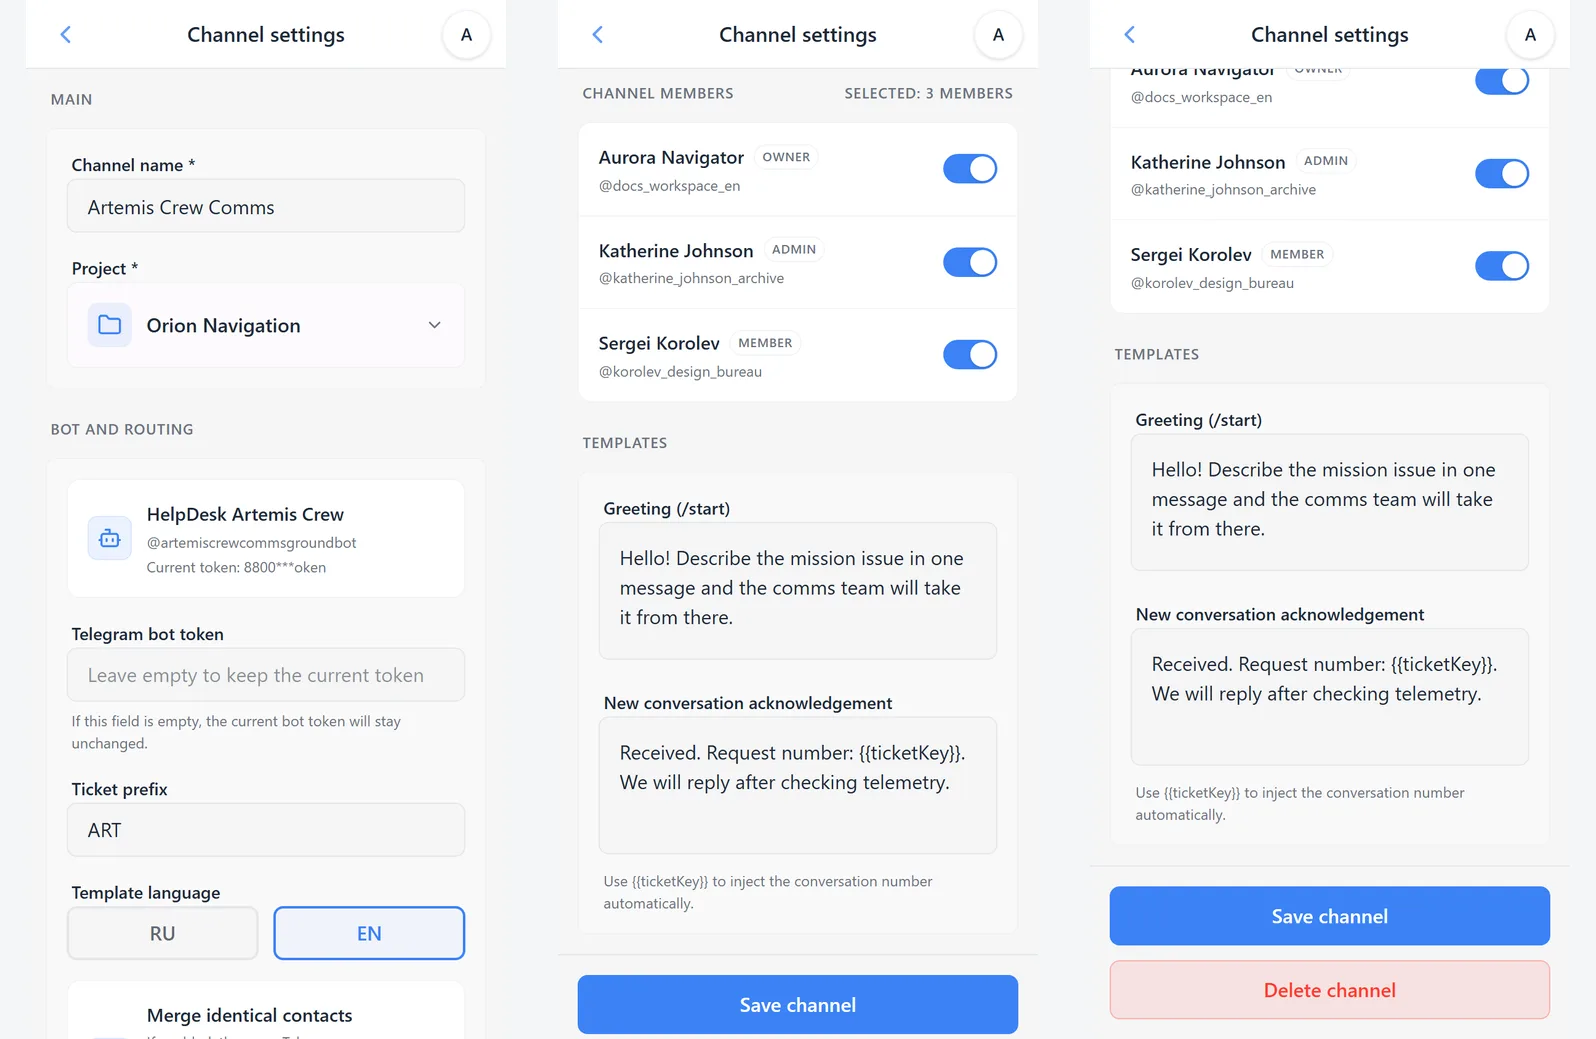
- ● Channel name: the internal name used by your team. For example, “Website Support” or “Mobile Support”.
- ● Project: all conversations from this channel belong to the selected project. Linked tasks are also created or selected only inside that project.
- ● Channel members: the people who will see conversations, receive notifications, and be available for assignment. The list is automatically filtered by access to the selected project.
- ● Conversation prefix: a short code for conversation numbers. For example, a ticket may become HD-24.
- ● Template language: the language for the greeting and the acknowledgement text.
- ● Greeting (/start): what the bot sends when the client starts the conversation.
- ● New conversation acknowledgement: the message sent after the conversation is created. The template supports {{ticketKey}} so the conversation number is inserted automatically.
You can also enable Merge identical contacts. This is useful when the same client may contact you through multiple bots and you want to keep that person as one contact inside the workspace.
4. Method 1. Automatically creating a new bot through the Telegram helper
This is the new and most convenient option when the bot does not exist yet. iTasks first saves a draft channel, then opens a special Telegram link, and after the setup flow finishes it automatically retrieves the bot token. Once the token is received, the system configures the webhook and tries to activate the channel without any manual token copying.
- On the new-channel screen, fill in the name, project, members, and templates.
- In the New bot via Telegram helper block, tap Create a new bot.
- Telegram opens the managed-bot wizard for the manager bot.
- Confirm the bot creation inside Telegram.
- Return to iTasks: the channel will stay in Draft state until Telegram finishes sending the service payload.
- As soon as the token is retrieved, iTasks activates the channel automatically and updates the card in the list.
If Telegram was closed too early: reopen the channel card and use Open helper again. This opens the special link one more time and lets you finish the bot setup flow.
5. Method 2. Manual connection with a token
This flow still exists and is useful when the bot already exists or when you want to create it manually via @BotFather. In that case you bring the token to iTasks yourself, and the system then configures the webhook and activates the channel in the usual way.
- Create or open the required Telegram bot outside iTasks.
- Copy its token.
- In iTasks, open channel creation or edit an existing channel.
- Paste the token into Telegram bot token.
- Fill in the other channel settings and tap Add channel or Save channel.
When editing an already active channel, the current token is not shown in full. If you leave the token field empty, iTasks keeps the existing token unchanged.
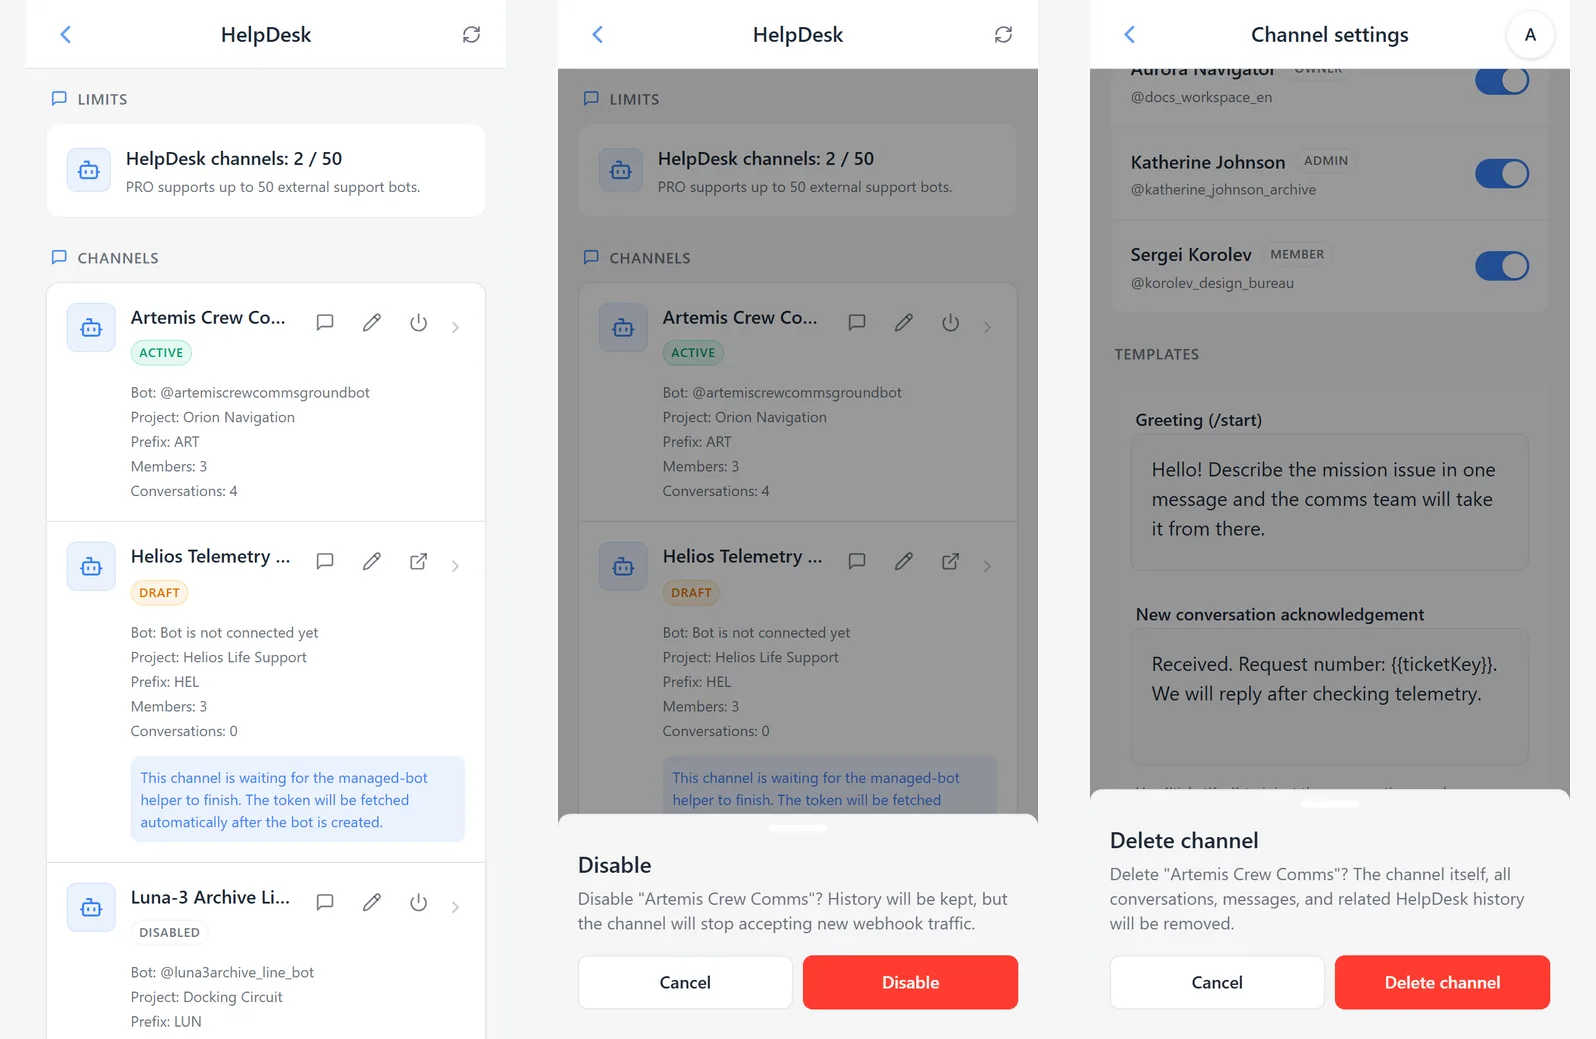
6. Channel states, enabling, and disabling
After saving, a channel moves into one of several technical states. These statuses help administrators immediately see whether the channel can accept new conversations.
- ● Draft: the channel exists, but the bot is not connected yet or the helper flow has not finished.
- ● Active: the token is saved, the webhook is configured, and new client messages are accepted.
- ● Disabled: the history is preserved, but no new webhook traffic is accepted until the channel is enabled again.
- ● Error: the last bot or webhook operation failed and the channel needs attention.
From the channel list you can:
- open the channel inbox and jump straight to the conversations;
- edit the channel settings;
- disable an active channel when you need to temporarily stop incoming traffic;
- activate the channel again if a token is already stored.
Disabling is the right option for a pause, such as bot maintenance or routing changes. The conversation history stays intact.
7. How the team works with conversations after the channel is connected
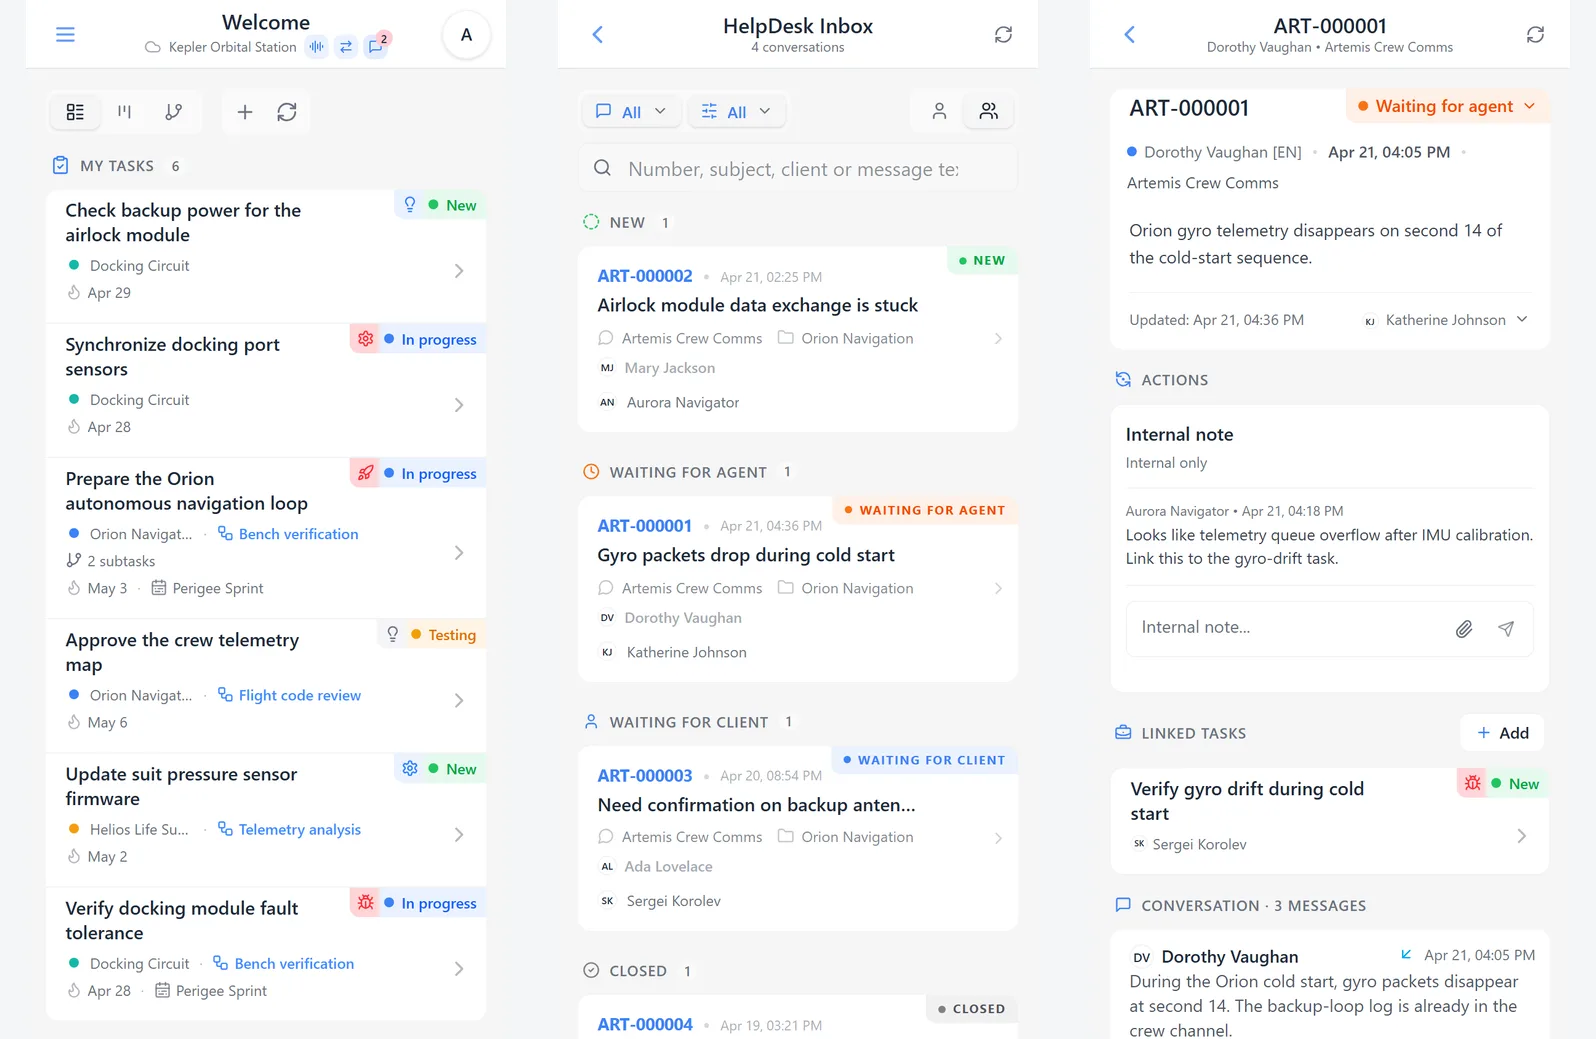
After activation, all new messages from the external Telegram bot appear in the HelpDesk inbox. Channel members receive notifications about new conversations and new client messages. The app provides a dedicated HelpDesk entry point, and the home screen shows an indicator with the number of conversations waiting for a reply.
A typical support flow looks like this:
- Open the HelpDesk inbox.
- Select the required conversation from the list.
- Assign an owner if the conversation should belong to a specific teammate.
- Use Reply to client for an external response.
- Use Internal note if the message should stay visible only to the team.
This workflow is described in more detail on the Inbox and Customer Replies page.
8. Conversation statuses, communication flow, and linked tasks
Every conversation has its own status so the team can track the current stage of work. In the current version, the available statuses are New, Open, Waiting for agent, Waiting for client, Closed, and Spam.
When the issue requires actual follow-up work, you can:
- create a new task directly from the conversation;
- link an existing task from the same project;
- keep support and execution in one context instead of copying details between tools.
Important: a conversation can only be linked to tasks from the same project that is assigned to the channel. That is why the project selection at channel setup time matters from the start.
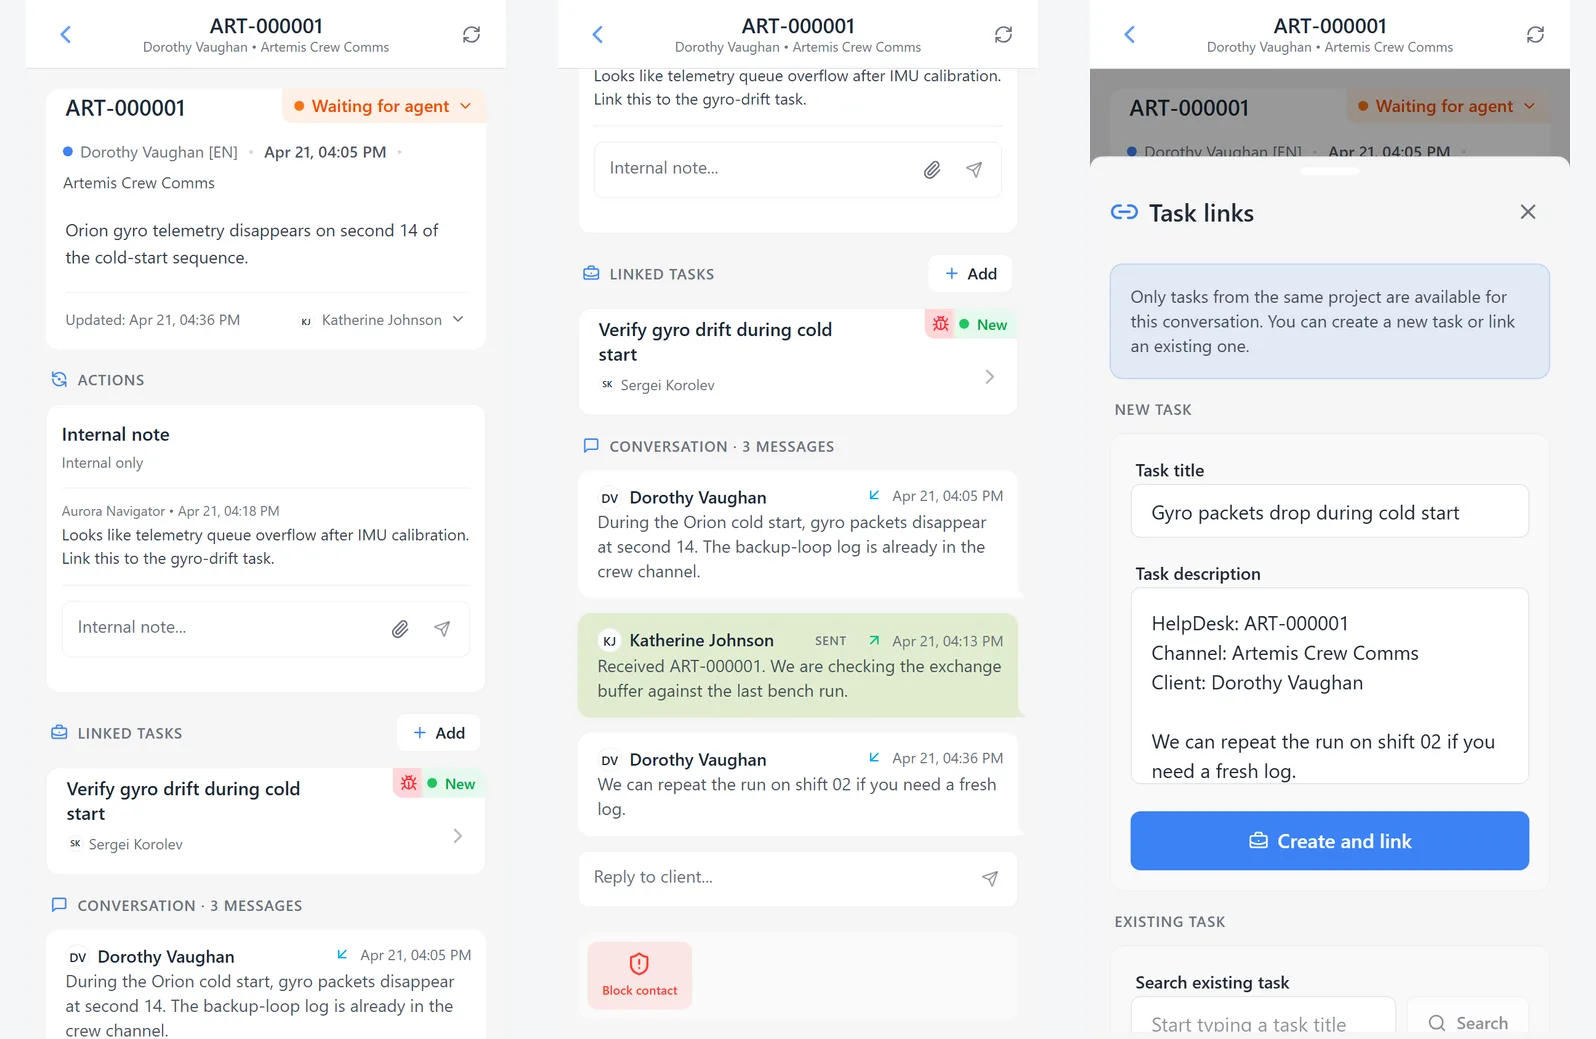
For the next level of detail, open Linking Conversations to Tasks and Files, Images, and Internal Notes.
9. How to disable or delete channels
There are two different shutdown scenarios for a channel, and it is important not to confuse them.
- ● Disable: use this from the channel list when you need to temporarily stop new incoming messages. History, conversations, and settings stay in place.
- ● Delete: open channel editing and tap Delete channel at the bottom under the save button. This removes the channel itself, all conversations, messages, and related HelpDesk history.
- If the channel may be needed again, choose disable.
- If the channel was only for testing or is no longer needed at all, use delete with confirmation.
- Before deleting, make sure the channel history does not contain any customer conversations you still need, because they are removed together with the channel.
If you want the next step after channel setup, continue to the inbox workflow and then to task linking.
Related topics
How the shared inbox works, how conversation cards are organized, how ownership is assigned, and how teams reply from the app.
How to create tasks from conversations, connect support work to existing tasks, and keep one shared context for the team.
How to keep the full conversation, files, images, and internal team notes in one support card without losing context.
Want to try this scenario in the app?
Open iTasks in Telegram now, and come back here when you need a full step-by-step guide.
Open iTasksExplore more features