Creating and Editing a Task
How to create a task in iTasks, fill in the description, checklists, tags, type, priority, due date, assignee, watchers, and the rest of the form without missing important details.
Creating and Editing a Task
You can create a task from the main screen with the + button, from the backlog, from a parent task, or from related flows such as HelpDesk. Fill in the essentials first: what needs to be done, which project it belongs to, and who owns it. The remaining fields help keep the due date, files, discussion, and team plan connected.
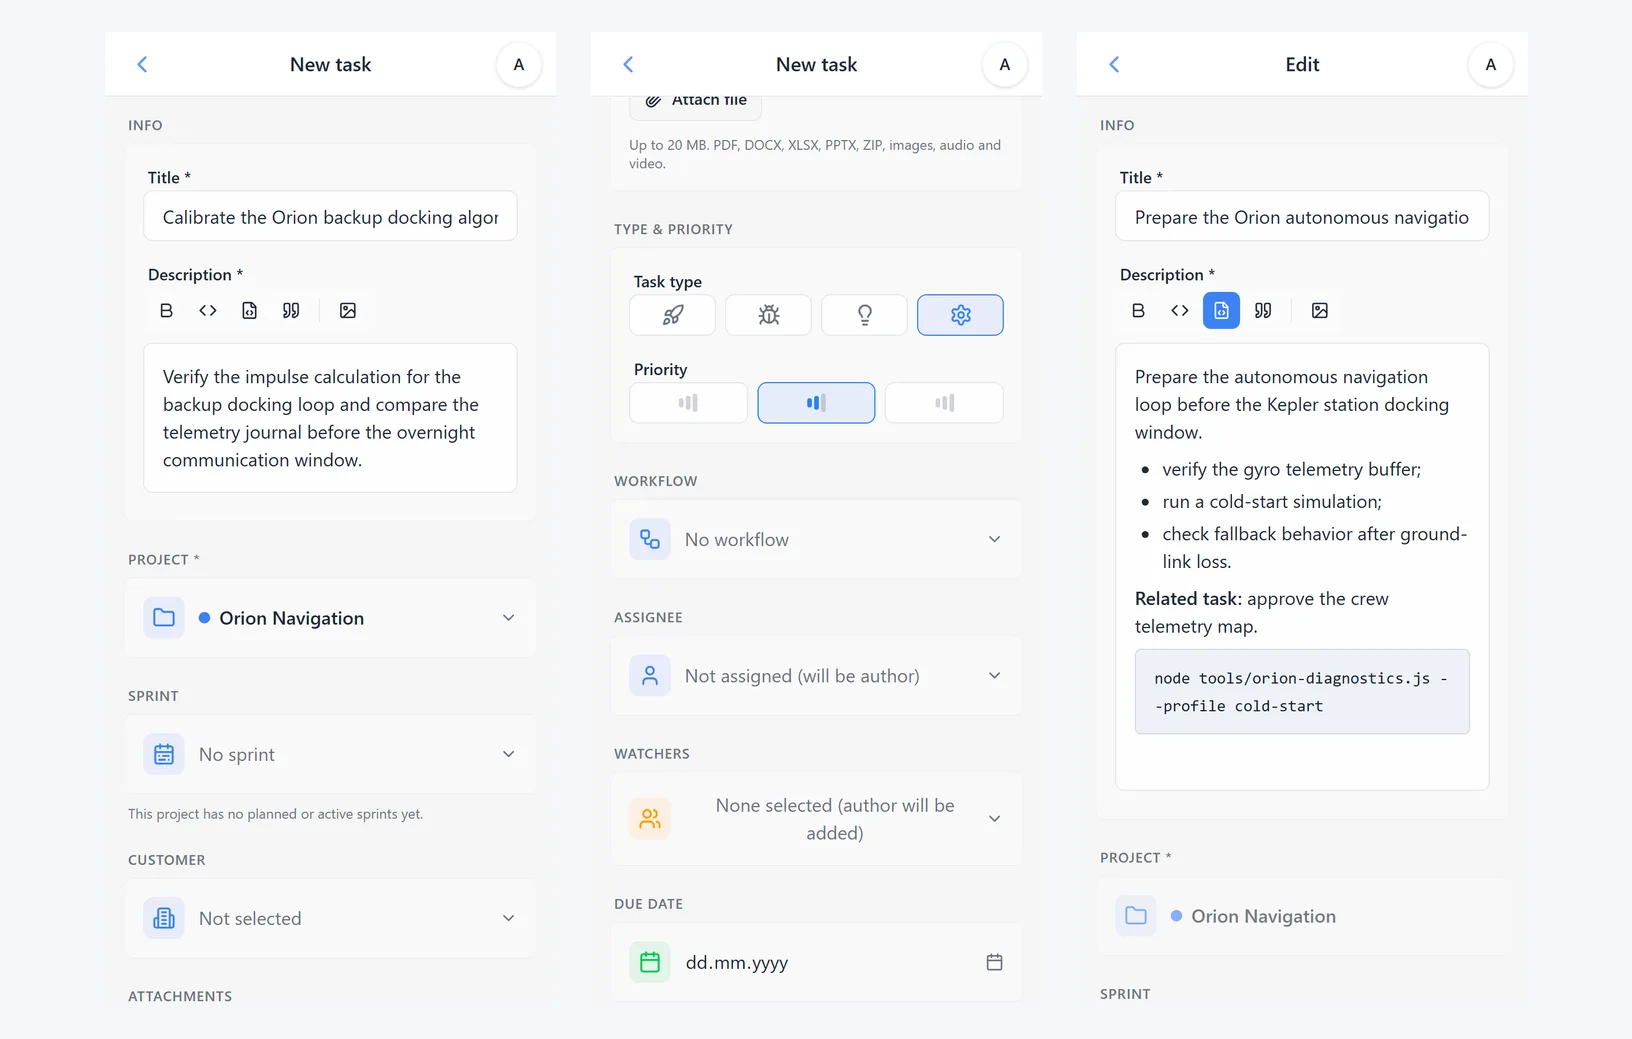
1. Title and description
The title should describe the result in a compact way, for example “Prepare the customer contract” or “Check the payment error”. Use the description for details that help the assignee work without extra questions: what needs to be done, where the materials are, and what counts as done.
The description supports formatting, lists, inline code, and code blocks. Files and editor behavior are covered in Attachments and Formatting.
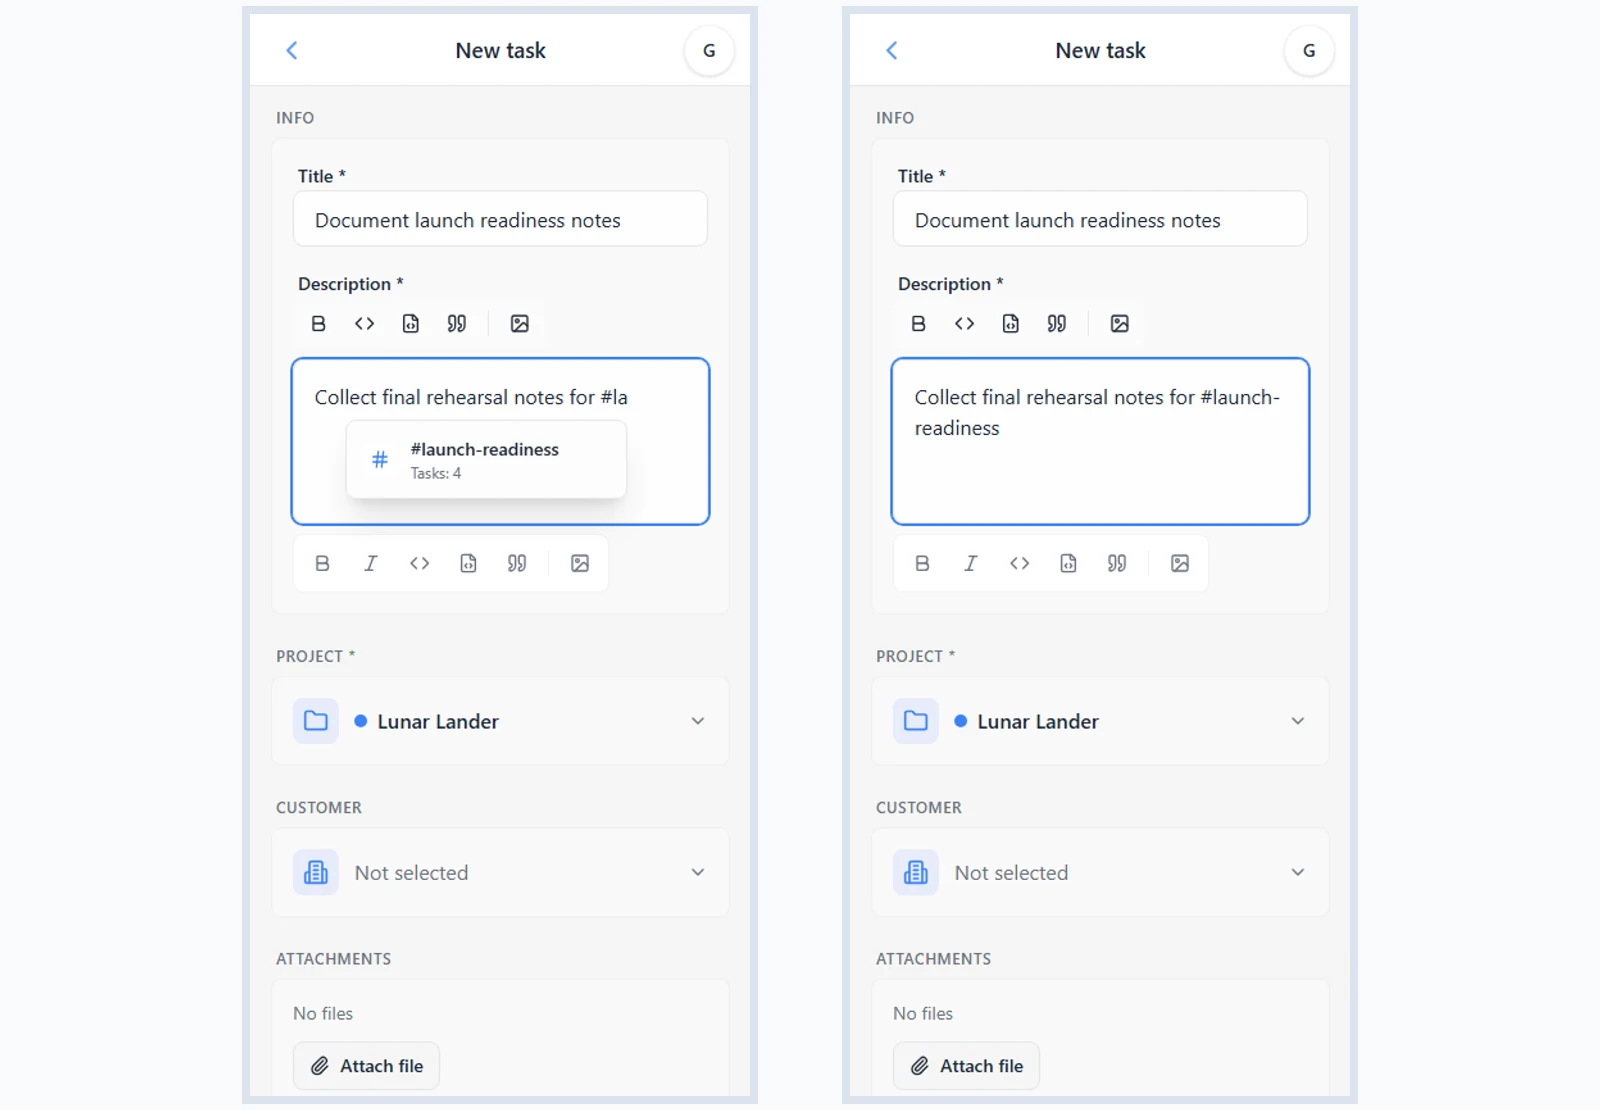
When a task should belong to a short-lived theme or mini-project, add a tag directly in the description, such as #launch-readiness or #telemetry. As soon as you type #, the editor suggests similar recent workspace tags, but you can still type a brand-new tag without choosing a suggestion.
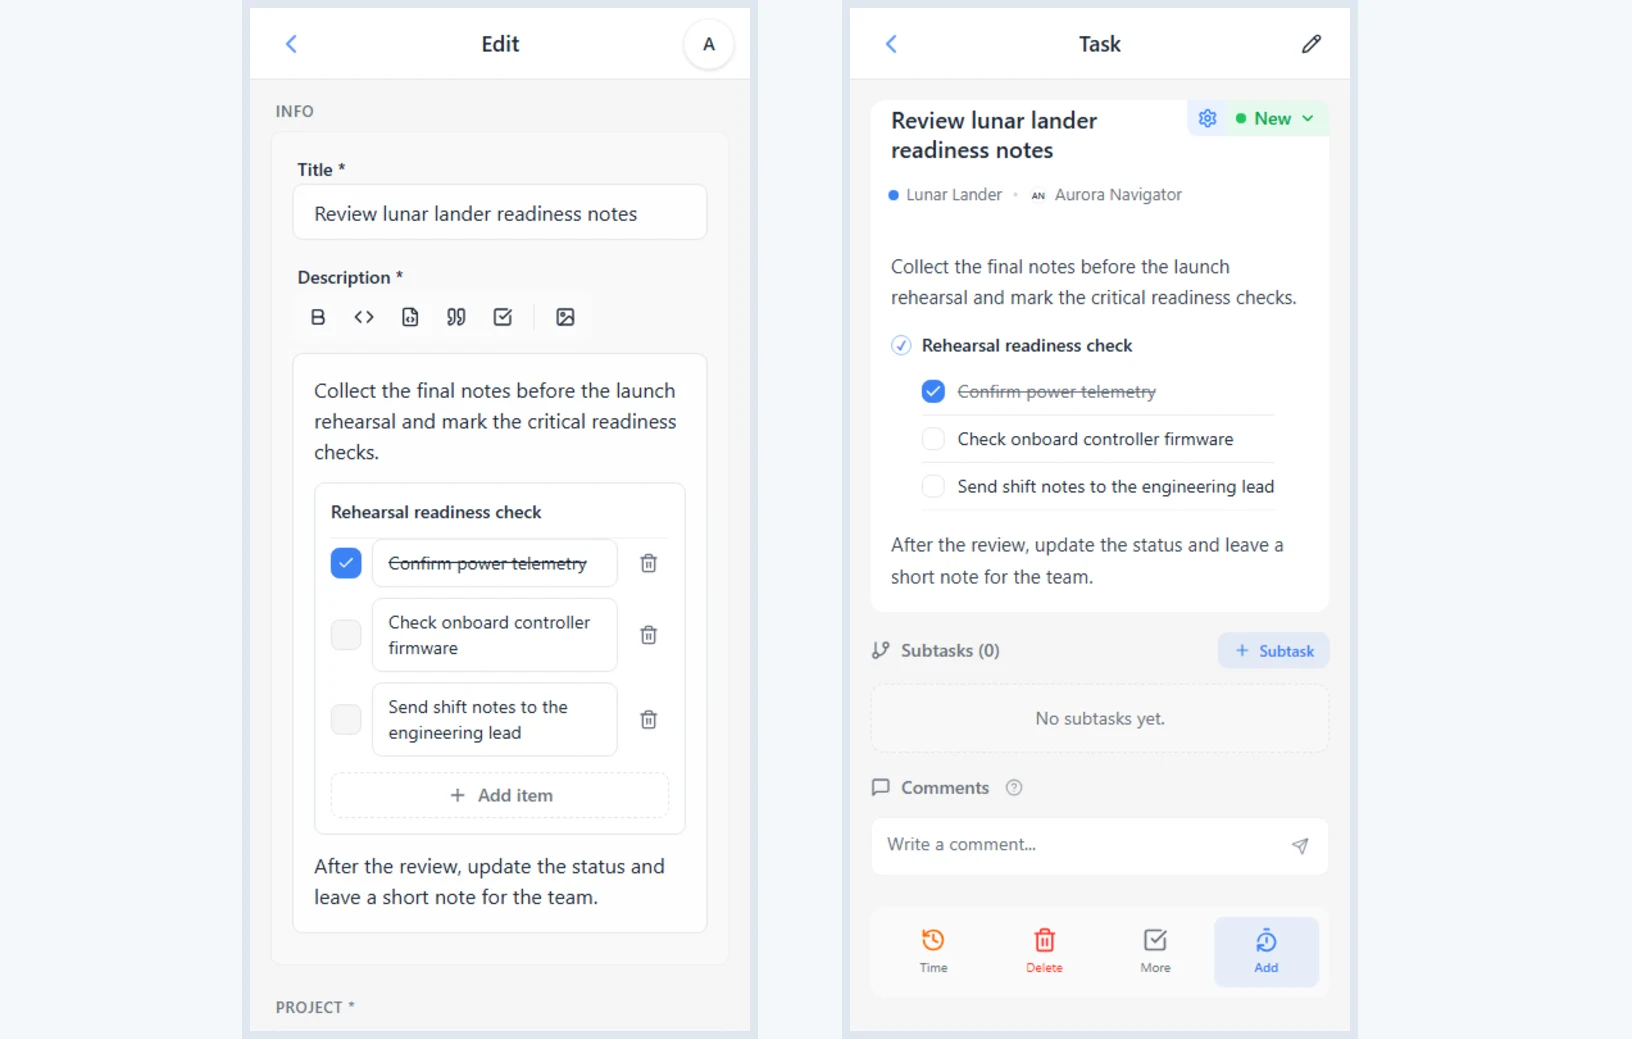
2. Checklists in the description
You can insert a checklist into the description with the checklist button in the editor toolbar. In edit mode, it is a regular block inside the text: the title and items can be changed, new items can be added, and unnecessary items can be removed with the button next to the item. After saving, the checklist becomes interactive for users who can edit the task: the task author, a workspace admin, or the workspace owner. They can press an item to check it, and press it again to clear the check.
Checklists embedded in a task are not standalone tasks. They are meant for self-checks inside one task: reviewing several steps, marking prepared materials, or checking a short set of conditions before closing the work.
A single task can contain as many checklists as needed. If the work should be split into connected tasks with separate assignees, statuses, due dates, or discussions, use subtasks and the task tree.
3. Project, sprint, and customer
The project is required: it decides who can see the task and which list it appears in. If the task is created as a subtask, the project is inherited from the parent task and cannot be changed separately.
A sprint is useful when the team plans work for a short period and wants to place the task into an active or upcoming plan. The customer field helps show which client, direction, or external request the task belongs to.
Project and access setup is covered in Projects. Creating, filling, and starting sprints is covered in Sprints and Planning. Who can see and receive tasks in a project is covered in Members and Roles.
4. Attachments, type, and priority
You can attach working files to a task: PDFs, office documents, archives, images, audio, and video. This is useful for layouts, contracts, reports, error screenshots, or voice materials.
The task type explains the kind of work: feature, bug, improvement, or technical task. Priority helps the team see what should be handled earlier. These labels are visible on task cards and make task lists easier to scan.
Files and formatting are covered in Attachments and Formatting. To read labels, status, and the rest of a saved task, see Task Details and Status Changes.
5. Workflow, assignee, and watchers
Choose a workflow when the task should follow predefined steps, such as preparation, review, and completion. If no workflow is needed, the task can be moved with regular status changes.
The assignee is the person responsible for the next step. If the field is left empty, the task author becomes the assignee. All project members can see the project's tasks, while watchers additionally receive notifications about status changes and new comments. Workspace owners and admins can change any task available to them; a member can change a regular task status or execute workflow transitions only when they are the task author or assignee. Other project members, including watchers, can read and comment on the task. The task author is added as a watcher automatically. Due-date notifications go only to the assignee.
Workspace statuses are configured in Custom Statuses. Workflow setup and use are covered in Workflows. Task discussions and mentions are covered in Comments, Replies, and Mentions.
6. Due date
A due date is the date by which the task should be completed. It appears on task cards and lists, making tasks with approaching dates easier to notice.
Tasks can be sorted by due date: nearest dates can be moved to the top of the list or sorted inside Kanban columns. List, Kanban, project tree, filters, and sorting are covered in Task View Modes.
On the due date, the assignee receives a notification. The delivery time is configured in the user's profile in Notifications. The same page lets users enable an early reminder 1, 2, or 3 days before the due date. It arrives as a separate notification and does not replace the notification on the due date itself.
If the task is already done or is still in backlog, due-date notifications are not sent. For deferred ideas and future work, use the Backlog, then add a due date when the task actually enters work.
7. Recurrence
Enable recurrence for tasks that should come back regularly: every day, week, month, or year. The next task is created after the current one is closed, so the team finishes the current work before getting the next instance.
Recurrence is available only for root tasks without a parent and without subtasks. If the work is already split into a task tree, decide whether it should be one recurring task or a regular parent task with subtasks. Task nesting is covered in Subtasks and Task Tree.
8. Editing
The task author, a workspace admin, or the workspace owner can edit task fields. Open the task details screen and press the pencil icon. Edit mode uses the same fields, but some settings may be locked: for example, a subtask inherits its project from the parent task, and a task with subtasks cannot be converted into a recurring task.
Related topics
How the iTasks task details screen is structured, where to view tags, change status, review change history, inspect details, and jump to related actions.
How to break large tasks into multi-level subtasks, navigate with the task tree, and keep complex work structured inside iTasks.
How to use built-in task discussions, quoted replies, mentions, jump-to-message, and links to other tasks inside iTasks.
How to attach files and images to tasks, use rich text and code blocks, and format task descriptions so they stay clear and easy to read.
When to use list, Kanban, or project tree views, how to switch task modes, apply filters, tags, and sorting.
Want to try this scenario in the app?
Open iTasks in Telegram now, and come back here when you need a full step-by-step guide.
Open iTasksExplore more features